| Customer Email: | * | |
| Subject: | * | |
| Message: |
How do I upload files over 5GB?
To upload large files, please give us a call at 800-995-1555 and we will be happy to assist you.
FILE CHECKLIST:
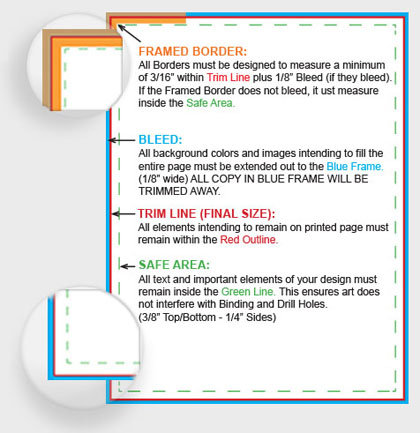
Bleed, Trim, and Safety: There are three main elements to know when setting up a document with a bleed. They are the bleed line, trim line, and safety line. Bleed Line: 1/8" (.125) One important custom printing term to know is a bleed. Bleed refers to an extra 1/8" (.125) of image that extends beyond the trim area of your printing piece. The project is printed on an oversized sheet that is cut down to size with the appearance that the image bleeds off the edge of the paper. Trim Line: Trim line indicates where to trim the printed sheet or where the edge of the paper is to ensure that the edges of the printed document are printed correctly. Similar to register or crop marks. The trim line is the final document size. Safety Line: The safety line or inner margin is the area in which to keep all important elements (text, logo, and/or content) within to prevent them from trimming off. All important elements should be at least 1/8" (.125) inside the edge of the trim line. The cutting of your printed piece is done in large stacks and may vary from the top and the bottom of the stack. Framed Border: All borders need to be 3/16" within the Trim Line as well as 1/8" extending out over the bleed line (Blue Frame). Fold Line: Templates also include fold marks that indicate where the fold will be. It is best to line up your panels with the folding marks to ensure the fold being in the correct spot on the panel in final production. |
|
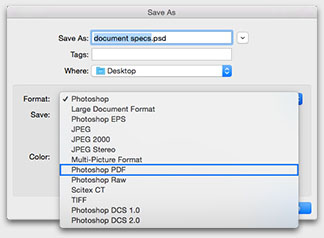
Adobe PDF Setting Is the Easiest Way to Submit Files And Offers Less Chance For File Errors.
(InDesign, Illustrator, Photoshop).
On a MAC:
Download > Double Click Zip File > Double Click Button > Click OK
On a MAC Adobe recognizes the preset and automatically embeds it into the Adobe Design Programs.
On a Windows OS:
Download > Double Click Zip File > Select File > Copy (ctrl c) > Paste (ctrl v) to your Desktop
Illustrator: Edit > Adobe PDF Presets > Click Import > Select PrintingCenterUSA.joboptions
InDesign: Edit > Adobe PDF Presets > Define > Load > Select PrintingCenterUSA.joboptions
Photoshop: Edit > Adobe PDF Presets > Define > Load > Select PrintingCenterUSA.joboptions
On a Windows OS it does not recognize the preset so you have to import it into the Adobe Creative Suite programs one at a time manually.
Click the Options Icon to Download the Adobe Preset Setting 
Accepted Files: .pdf, .tiff, .jpeg .psd (photoshop), .ai (illustrator), .eps (illustrator or photoshop), .indd (InDesign) The recommended file is a PDF file but we will accept high resolution (300dpi) .tiff, .jpeg or the original source file from the following programs Photoshop (.psd), Illustrator (.ai or .eps), and InDesign (.indd). If working in a program not mentioned files must be exported as a PDF. EXAMPLE: PDF conversion instructions |
 |
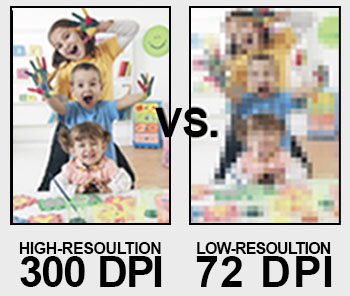
Recommended Image Resolution: 300 dpi File and/or Image resolution should be set at 300 dpi to ensure that the final document is not pixelated (fuzzy) when printed. Enlarging an image will lower the resolution while reducing an image will increase the resolution. Enlarging an image in a layout is NOT recommended. Images that are less than 300 dpi could reproduce poorly looking fuzzy or pixelated. Images from the internet are not recommended, as most images are only 72 dpi. An unfavorable image cannot be resaved as a different type of file. For example, you cannot place a gif file in Photoshop and resave it as an EPS file. This does not change the compatibility of the file. If you have to use low-resolution images we will print only after you consent to the quality. |
 |
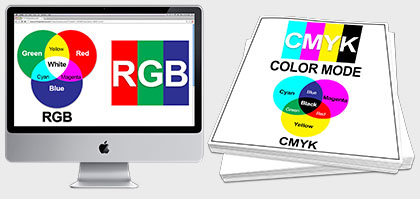
Required Color Mode: CMYK CMKY (cyan, magenta, yellow, and black) is a color system called Full Color Printing. Most commercial printers use this process. RBG (red, green, and blue) is the color process that your computer monitor uses to display color. It is important to convert your file to the CMYK color process before printing as it may cause a color shift durning the transition and give you unexpected results. All files submitted that are not CMYK, will be converted over before printing. If your project is color sensitive, it is recommended that you request a hard copy proof to ensure the end result is to your specifications. EXAMPLE: RBG displays digitally and CMYK for print. |
 |
Font and Transparency: We recommend that all transparencies be flattened before file submission. We also ask that you set your fonts to outlines prior to file submission. Not flattening or outlining fonts can cause some items to fall off during file preparation for printing. Any files submitted without these things being done may result in items dropping out from your artwork during the conversion process needed to prepare your artwork for printing. |